🎛️ Handlers#
Handlers are where your bot reacts to incoming WhatsApp updates.
In pywa, every incoming webhook update is converted into a typed update object, such as
Message, CallbackButton, or
MessageStatus. You register callback functions for the update types you
care about, and pywa calls the right function when WhatsApp sends an update.
The usual workflow is:
Create a
WhatsAppclient.Register handlers with decorators or
Handlerobjects.Give WhatsApp a public callback URL.
Run the app with
pywa devwhile developing, orpywa runfor production.
This guide starts with the day-to-day part: writing handlers.
Your First Handler#
A handler callback receives the WhatsApp client and the update object.
 1from pywa import WhatsApp, filters, types
 2
 3wa = WhatsApp(
 4    phone_id="1234567890",
 5    token="EAA...",
 6    verify_token="my-verify-token",
 7)
 8
 9@wa.on_message(filters.text)
10def echo(client: WhatsApp, msg: types.Message):
11    msg.reply(f"You said: {msg.text}")
Then run the file with the pywa CLI:
pywa dev
pywa dev starts the webhook server and reloads it when your code changes.
Registering Handlers#
You can register handlers in two main ways:
Decorators, which are the simplest option for most projects.
*Handlerobjects, which are useful when handlers are assembled dynamically.
Using decorators#
Use the on_... decorators on your WhatsApp client.
 1from pywa import WhatsApp, types
 2
 3wa = WhatsApp(...)
 4
 5@wa.on_message
 6def handle_message(client: WhatsApp, msg: types.Message):
 7    print(msg)
 8
 9@wa.on_callback_button
10def handle_callback_button(client: WhatsApp, clb: types.CallbackButton):
11    clb.react("❤️")
You can pass filters to the handlers:
 1from pywa import WhatsApp, filters, types
 2
 3wa = WhatsApp(...)
 4
 5@wa.on_message(filters.text)
 6def handle_text_message(client: WhatsApp, msg: types.Message):
 7    msg.reply(f"You said: {msg.text}")
 8
 9@wa.on_message(filters.image | filters.video)
10def handle_media_message(client: WhatsApp, msg: types.Message):
11    msg.reply(f"Thanks for sending a media message.")
See the filters guide for built-in filters and custom filters.
Loading handlers from modules#
If your handlers live in another module and do not have direct access to the client instance,
register them on the WhatsApp class:
1from pywa import WhatsApp, filters, types
2
3@WhatsApp.on_message(filters.text) # Register on the class, not an instance
4def handle_text(client: WhatsApp, msg: types.Message):
5    msg.reply(msg.text)
Then load that module when creating the client:
1from pywa import WhatsApp
2from . import my_handlers # Import the module that holds the handlers
3
4wa = WhatsApp(
5    ...,
6    handlers_modules=[my_handlers,], # Pass the module to load handlers from it
7)
You can also load modules later:
wa.load_handlers_modules(my_handlers)
Dynamic Handler Registration#
You can register and remove handlers dynamically at runtime instead of declaring them all at startup. This is useful for state-dependent workflows (e.g., toggling a temporary maintenance mode) where handlers are added or removed on the fly.
To register a handler dynamically, instantiate one of the Available Handlers and pass it to add_handlers(). To stop listening, pass the same handler instance to remove_handlers().
Here is an example demonstrating how to register a high-priority maintenance handler and dynamically remove it:
 1from pywa import WhatsApp, filters, handlers, types
 2
 3wa = WhatsApp(...)
 4
 5admin_filter = filters.from_users("1234567890", "9876543210")
 6
 7# Define a high-priority handler callback that intercepts messages during maintenance
 8def maintenance_callback(client: WhatsApp, msg: types.Message):
 9    msg.reply("🛠️ The bot is currently undergoing maintenance. Please try again later.")
10    msg.stop_handling()  # Prevent other, lower-priority handlers from running
11
12# Create the handler instance with high priority
13maintenance_handler = handlers.MessageHandler(
14    callback=maintenance_callback,
15    filters=~admin_filter, # Only non-admins
16    priority=100,
17)
18
19# Handler to turn maintenance mode ON or OFF
20@wa.on_message(filters.command("maintenance") & admin_filter)
21def enable_maintenance(client: WhatsApp, msg: types.Message):
22    if msg.text.split("maintenance")[1].strip() == "on":
23        client.add_handlers(maintenance_handler)
24        msg.reply("Maintenance mode has been activated.")
25    else:
26        client.remove_handlers(maintenance_handler, silent=True)
27        msg.reply("Maintenance mode has been deactivated.")
Available Handlers#
Decorator |
Handler |
Update type |
|---|---|---|
Handlers or Listeners?#
Handlers are best for app entry points: commands, buttons, statuses, template events, and other updates that start a unit of work.
When you need to continue a conversation and wait for the user’s next message, use a listener.
1from pywa import WhatsApp, filters, types
2
3wa = WhatsApp(...)
4
5@wa.on_message(filters.command("start"))
6def start(client: WhatsApp, msg: types.Message):
7    age = msg.reply("Hello! What's your age?").wait_for_reply(filters.text).text
8    msg.reply(f"Nice, you are {age}.")
Read more in the listeners guide.
Making WhatsApp Reach Your App#
WhatsApp sends updates to a public HTTPS callback URL. During local development, that usually means opening a tunnel from the internet to your local server.
Pywa provides start_ngrok_tunnel() for this:
 1from pywa import WhatsApp, filters, types, utils
 2
 3callback_url = utils.start_ngrok_tunnel(
 4    port=8000,
 5    auth_token="your-ngrok-auth-token",
 6    domain="subdomain.ngrok-free.app",
 7)
 8
 9wa = WhatsApp(
10    phone_id="1234567890",
11    token="EAA...",
12    app_id="1234567890",
13    app_secret="xxxx",
14    callback_url=callback_url,
15    verify_token="my-verify-token",
16)
17
18@wa.on_message(filters.text)
19def echo(client: WhatsApp, msg: types.Message):
20    msg.reply(msg.text)
Run the app:
pywa dev
Install the ngrok package before using the helper:
pip install ngrok
Tip
Use a static ngrok domain while developing. It keeps the callback URL stable across
restarts. After the first successful registration, you can usually comment out
callback_url to avoid registering the same webhook every time you restart the app.
You can also use any other HTTPS tunnel or deployed URL, such as:
Your production server URL
Registering the Callback URL#
WhatsApp must know where to send webhook requests. You can register the callback URL automatically with pywa or manually in the Meta app dashboard.
Automatic registration#
Automatic registration is the easiest option for development and for most apps.
Pass callback_url and verify_token to WhatsApp. For the default
app-level registration, also pass app_id and app_secret.
 1from pywa import WhatsApp, utils
 2
 3wa = WhatsApp(
 4    phone_id="1234567890",
 5    token="EAA...",
 6    app_id="1234567890",
 7    app_secret="xxxx",
 8    callback_url=utils.start_ngrok_tunnel(domain="subdomain.ngrok-free.app"),
 9    verify_token="my-verify-token",
10)
When the server starts, pywa registers the URL and handles WhatsApp’s verification challenge for you.
By default, pywa registers the URL in the app scope. You can use another scope with
callback_url_scope:
1from pywa import WhatsApp, utils
2
3wa = WhatsApp(
4    phone_id="1234567890",
5    token="EAA...",
6    verify_token="my-verify-token",
7    callback_url="https://example.com",
8    callback_url_scope=utils.CallbackURLScope.PHONE,
9)
The required IDs depend on the scope:
Scope |
Registers |
Required values |
|---|---|---|
|
The app webhook subscription |
|
|
A WABA alternate callback URL |
|
|
A phone-number alternate callback URL |
|
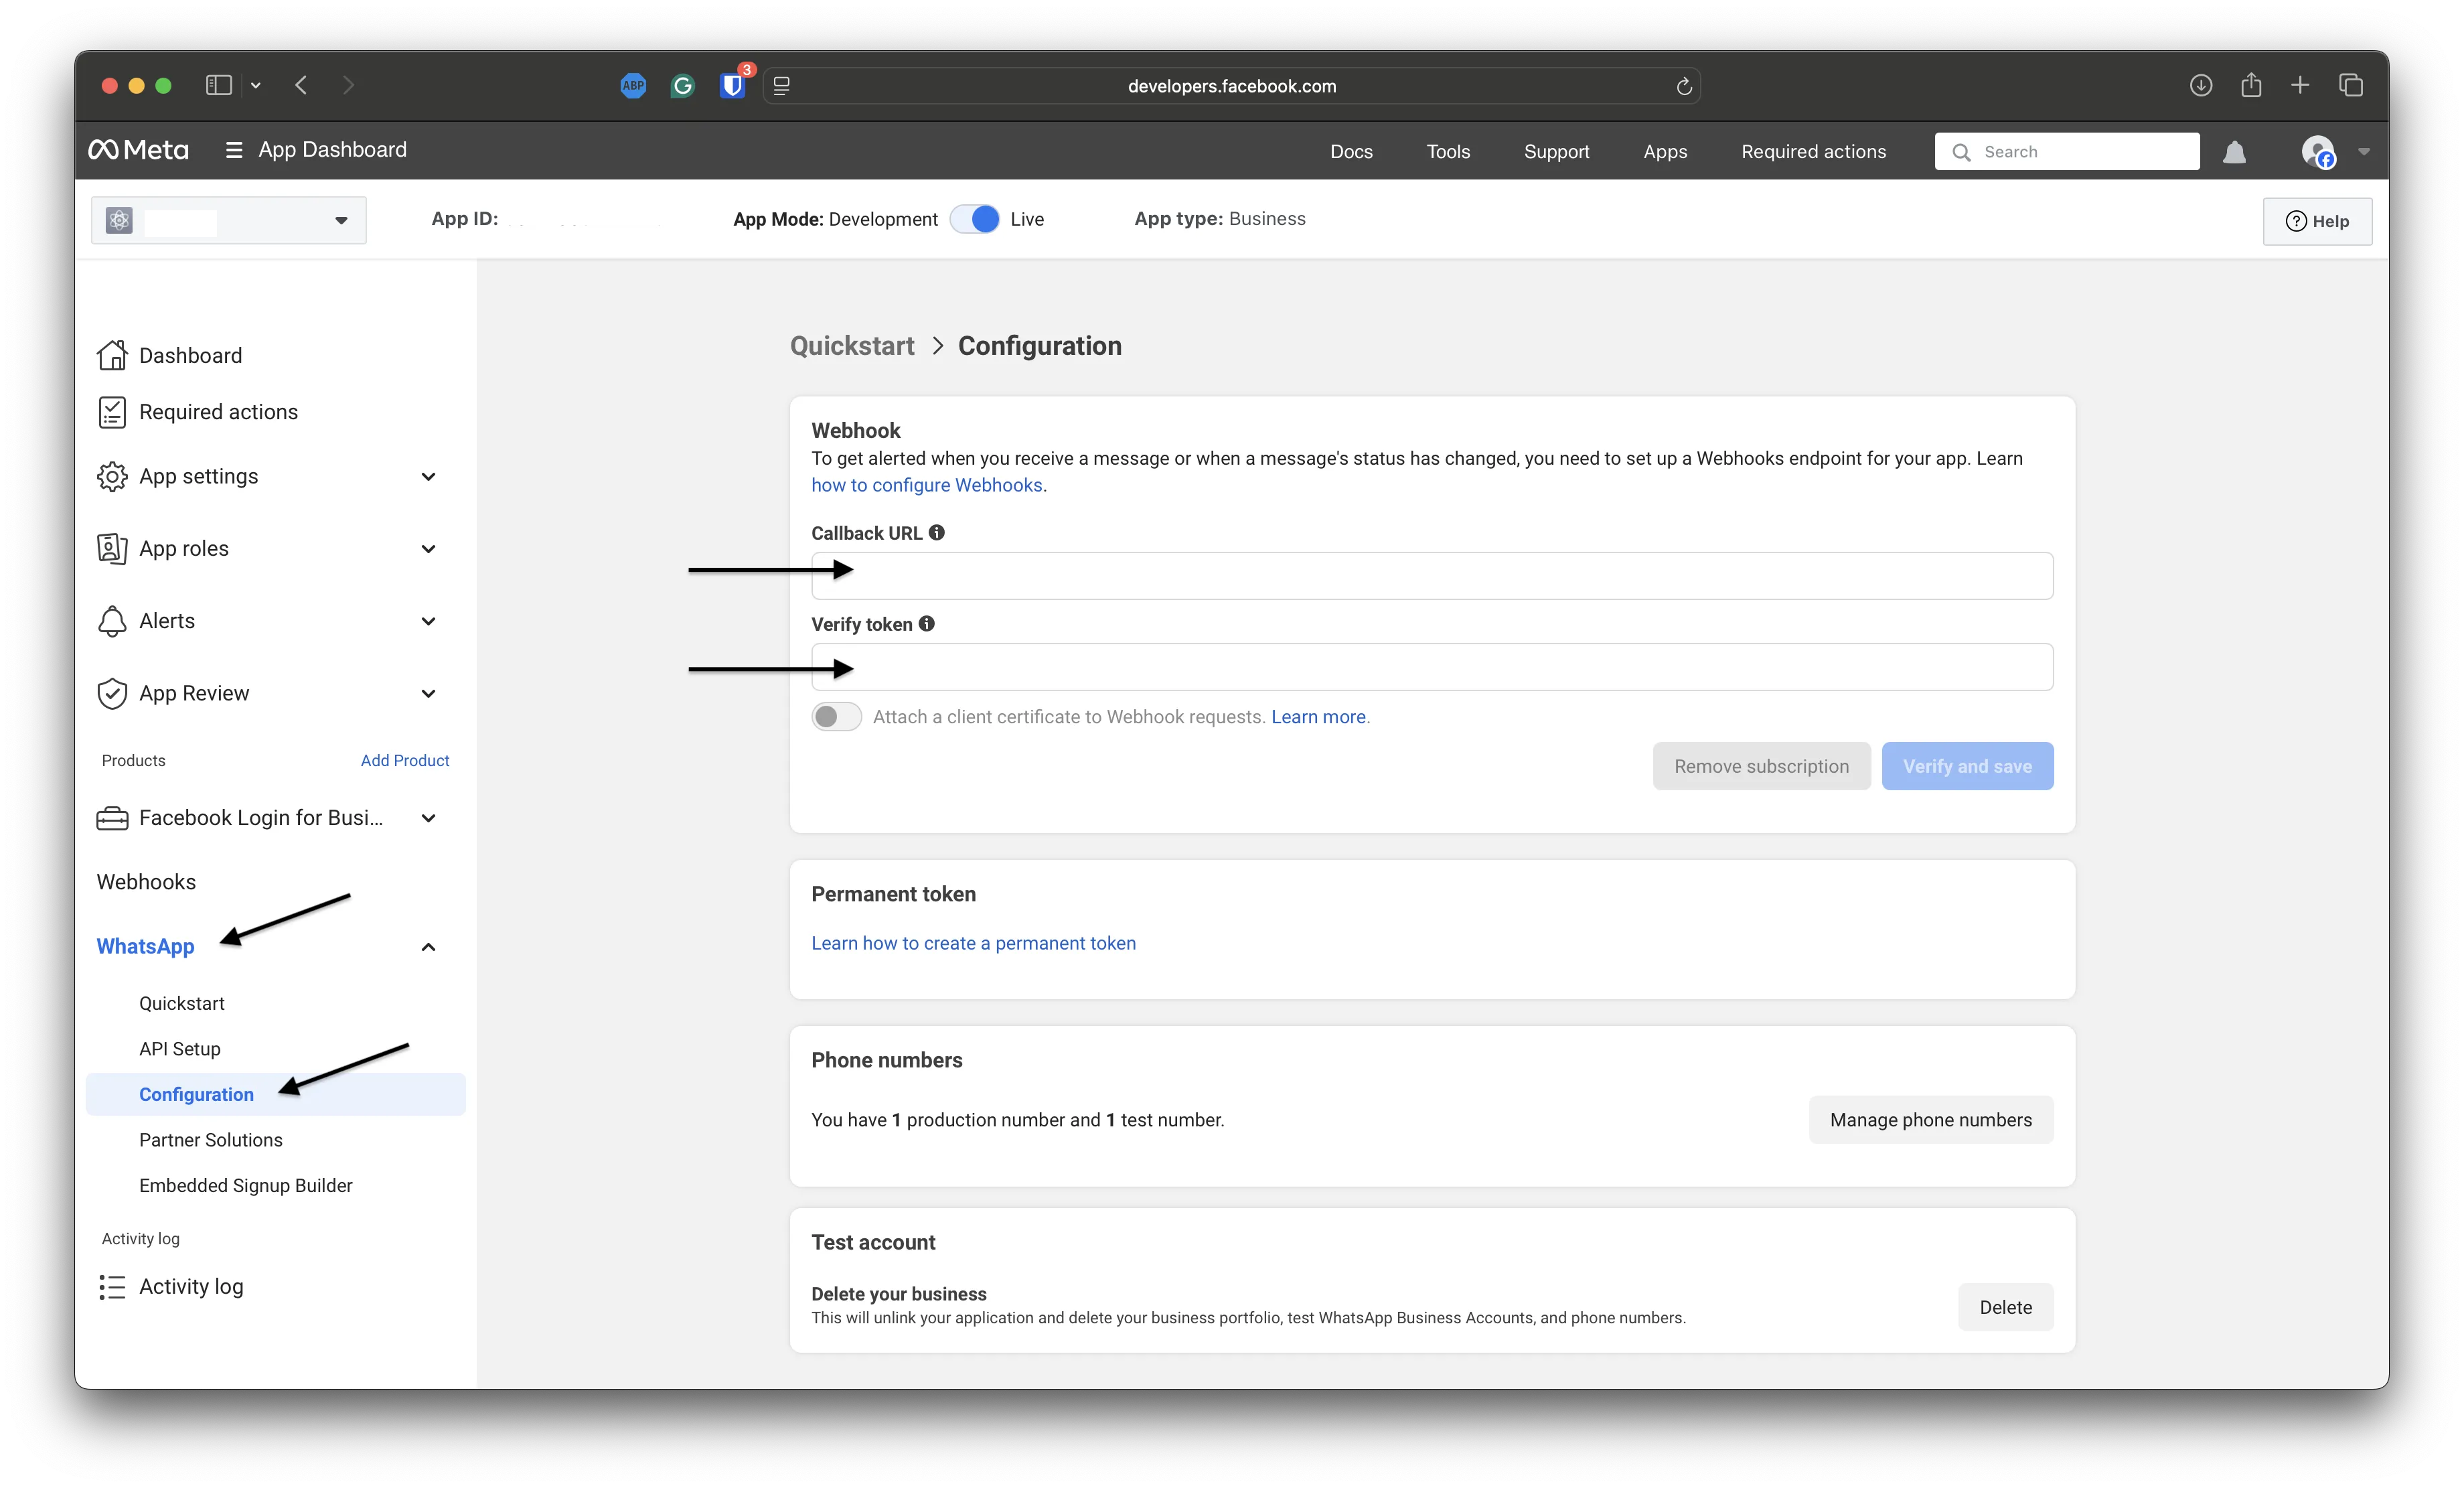
Manual registration#
If you prefer to register the URL yourself:
Create the client with the same
verify_tokenyou will enter in Meta.Start the app so pywa can answer the verification challenge.
Open App Dashboard > WhatsApp > Configuration.
Enter your public callback URL and verify token.
1from pywa import WhatsApp
2
3wa = WhatsApp(
4    token="EAA...",
5    verify_token="my-verify-token",
6)
Subscribing to Webhook Fields#
When registering manually, make sure your app is subscribed to the webhook fields you need.
Go to App Dashboard > WhatsApp > Configuration and scroll to Webhook Fields.
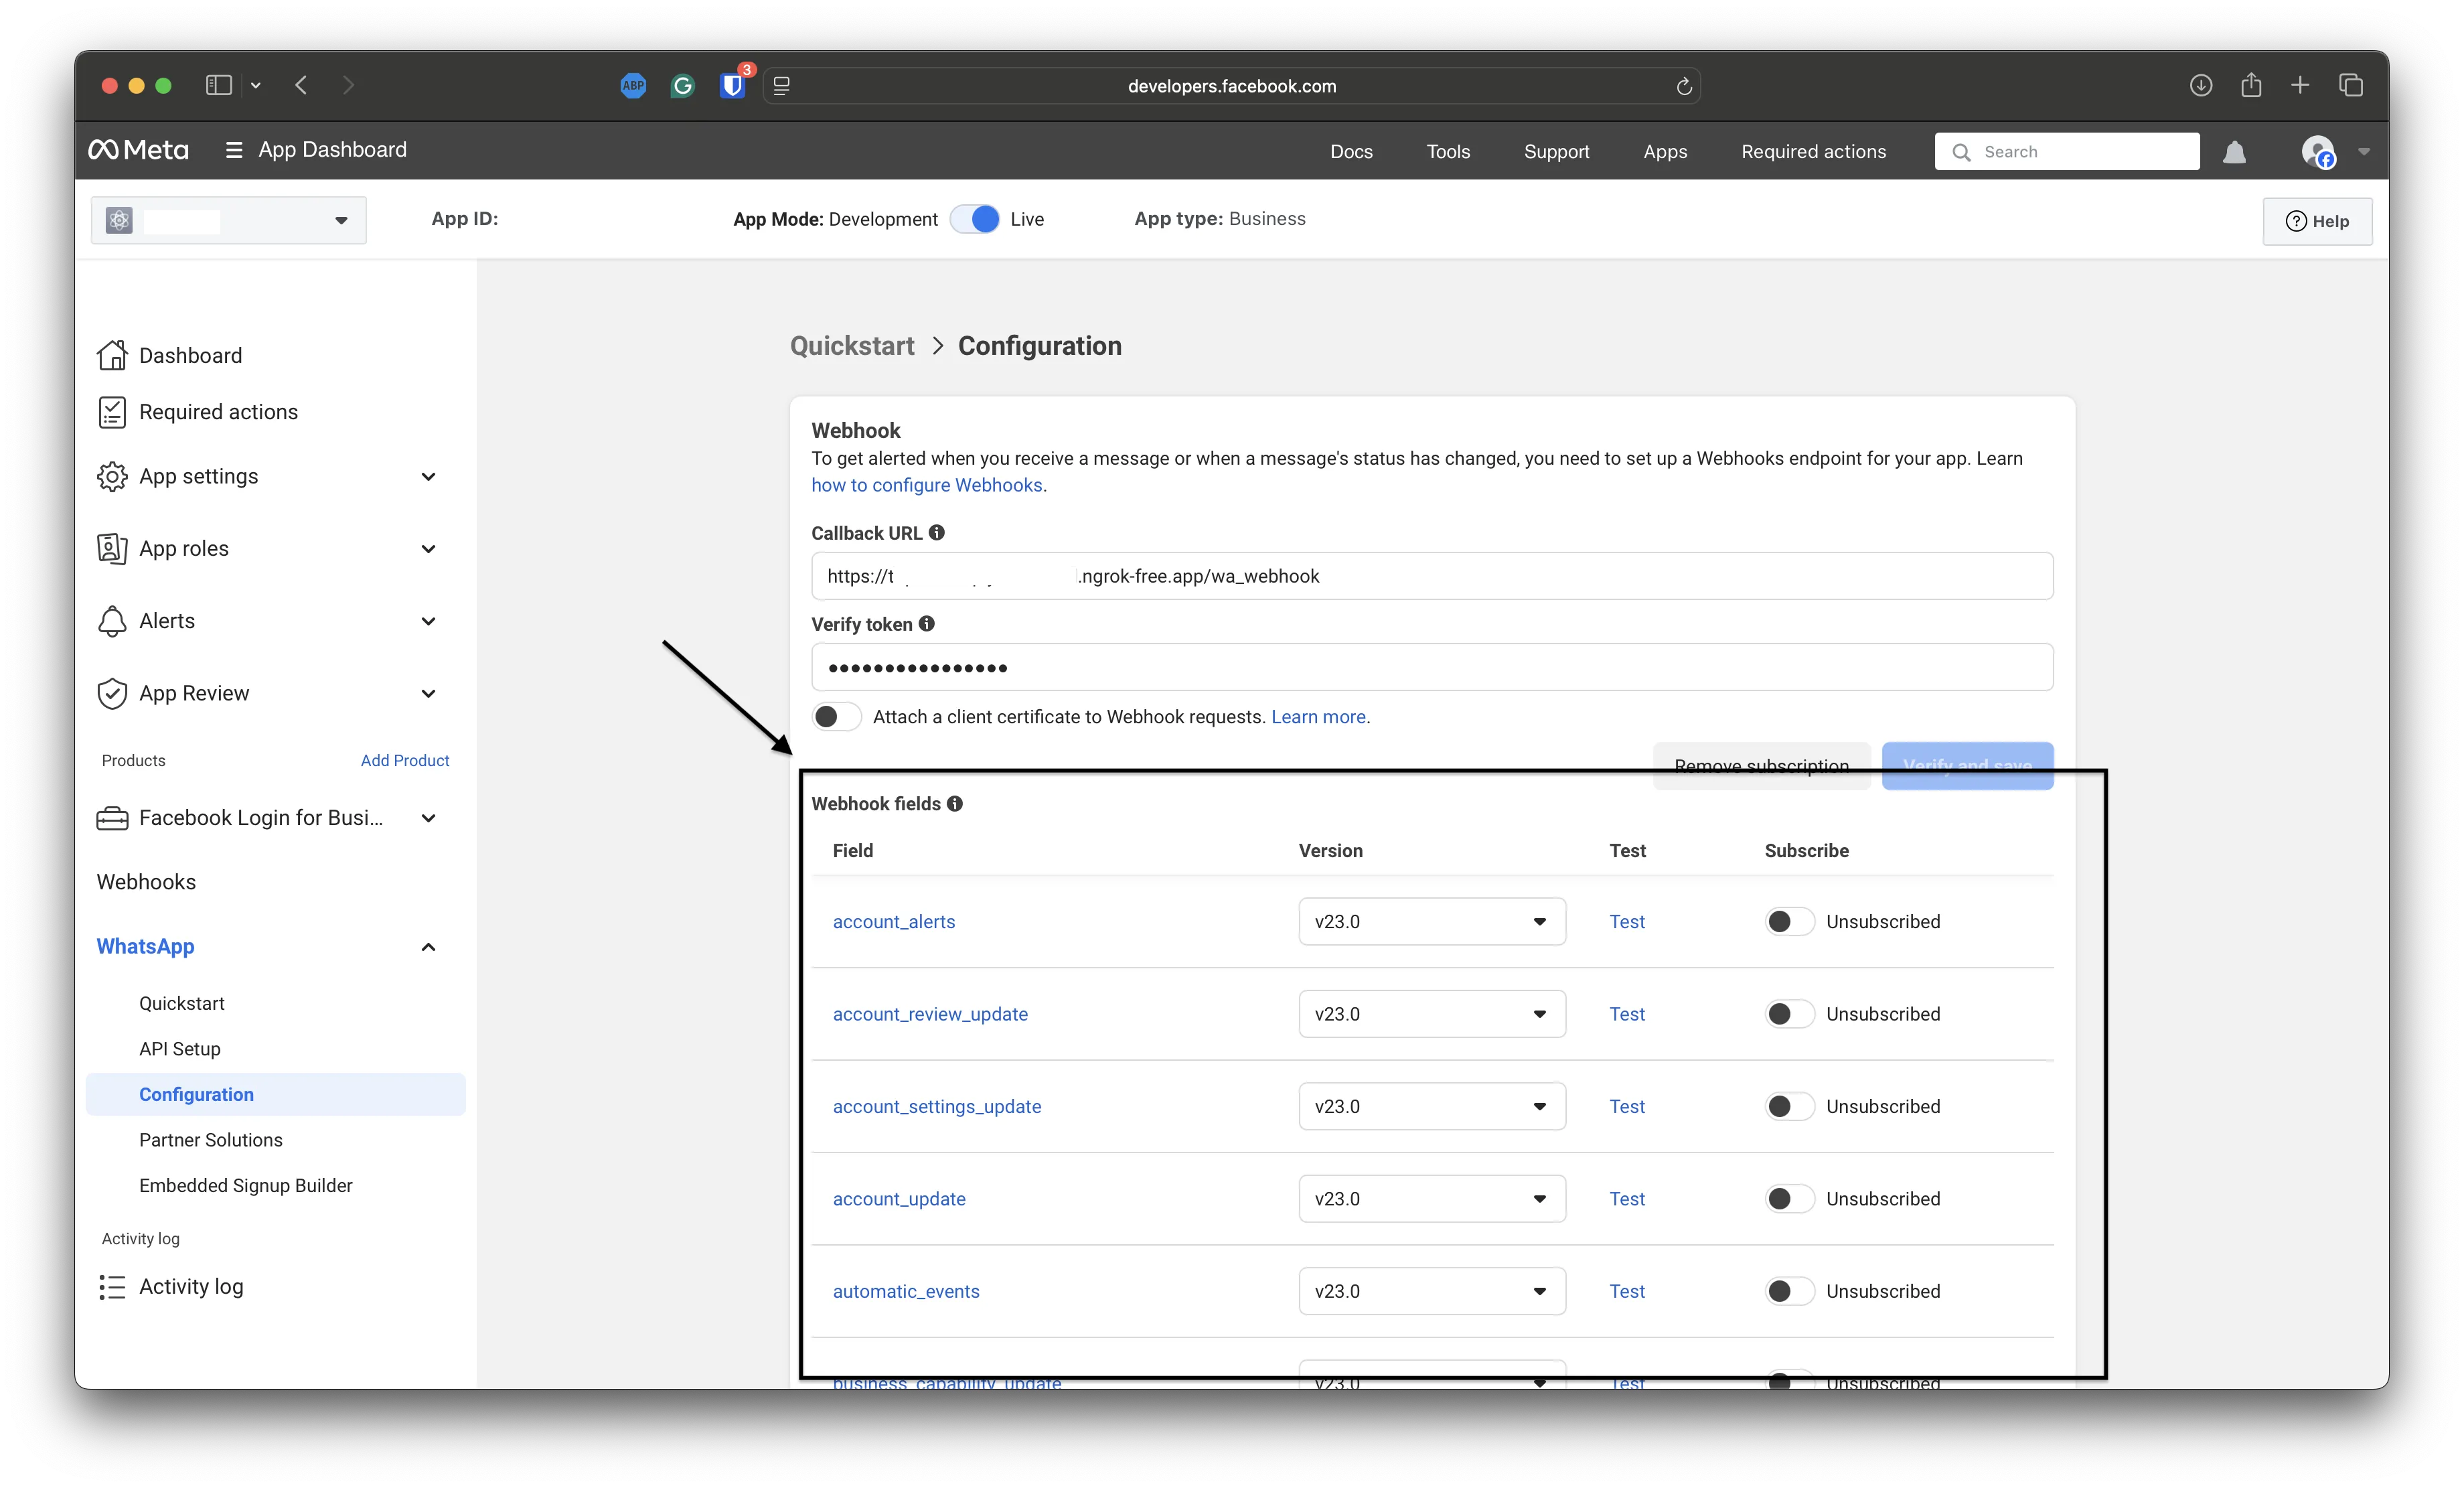
Pywa can process these fields:
messages- user messages, callbacks, and message statusescalls- call connect, terminate, and status updatesmessage_template_status_update- template approval or rejection updatesmessage_template_quality_update- template quality score updatesmessage_template_components_update- template component updatestemplate_category_update- template category changesuser_preferences- user marketing preferencesaccount_update- account update events
If you register the callback URL automatically, pywa subscribes to the webhook fields it
supports. You can customize the fields with webhook_fields.
Use on_raw_update() if you want to receive unsupported webhook
events yourself.
Running pywa#
After handlers and callback settings are in place, run the server.
Using the CLI (recommended)#
Install the server extras:
pip install "pywa[server]"
Use pywa dev while developing:
pywa dev
Use pywa run when you want to run without auto-reload:
pywa run main.py
Both commands run pywa’s built-in Starlette application with Uvicorn and register the webhook endpoint automatically.
You can also point the CLI to a specific client object:
pywa dev main:wa2
pywa run --app wa2
Common options include:
pywa dev --reload-dir src
pywa run --workers 4
Using WhatsApp.run()#
For quick scripts and prototypes, you can start the built-in server directly from Python:
1from pywa import WhatsApp
2
3wa = WhatsApp(...)
4
5# Register handlers here
6
7wa.run()
This uses the same Starlette-based webhook app, but it is blocking and does not include the
development features of pywa dev. Prefer pywa dev and pywa run for normal use.
Using FastAPI or Flask#
If your project already has a FastAPI or Flask app, pass it to server.
Pywa registers the webhook routes on that app, and you run the app yourself.
FastAPI:
 1from fastapi import FastAPI
 2from pywa import WhatsApp, filters, types
 3
 4app = FastAPI()
 5
 6wa = WhatsApp(
 7    ...,
 8    server=app,  # Pass your FastAPI or Flask app here
 9    webhook_endpoint="/whatsapp",  # Use different endpoint from "/" to avoid conflicts with your own routes
10)
11
12
13@wa.on_message(filters.text)
14def echo(client: WhatsApp, msg: types.Message):
15    msg.reply(msg.text)
16
17
18# Serve your own routes alongside pywa's webhook
19@app.get("/")
20def read_root():
21    return {"Hello": "World"}
Run FastAPI normally:
fastapi dev main.py
Flask works the same way:
 1from flask import Flask
 2from pywa import WhatsApp, filters, types
 3
 4app = Flask(__name__)
 5
 6wa = WhatsApp(
 7    ...,
 8    server=app,
 9    webhook_endpoint="/whatsapp",
10)
11
12@wa.on_message(filters.text)
13def echo(client: WhatsApp, msg: types.Message):
14    msg.reply(msg.text)
15
16if __name__ == "__main__":
17    app.run(port=8000)
If you pass a custom FastAPI or Flask server, pywa does not run it for you.
Handler Order and Flow#
By default, pywa stops after the first handler whose filter matches an update.
 1from pywa import WhatsApp, types
 2
 3wa = WhatsApp(...)
 4
 5@wa.on_message
 6def first(client: WhatsApp, msg: types.Message):
 7    print("first")  # <-- runs, then stops. second() is never called.
 8
 9@wa.on_message
10def second(client: WhatsApp, msg: types.Message):
11    print("second")  # <-- never reached, because first() matched first.
Handlers run in registration order unless you set priority.
Higher priority number runs first — a handler with priority=2 runs before one with priority=1.
 1from pywa import WhatsApp, types
 2
 3wa = WhatsApp(...)
 4
 5@wa.on_message(priority=1)
 6def first(client: WhatsApp, msg: types.Message):
 7    print("First:", msg)
 8
 9@wa.on_message(priority=2)
10def second(client: WhatsApp, msg: types.Message):
11    print("Second:", msg)
To keep checking later handlers by default, enable continue_handling:
1wa = WhatsApp(..., continue_handling=True)
You can also control the flow from inside a handler with
stop_handling() and
continue_handling().
 1from pywa import WhatsApp, filters, types
 2
 3wa = WhatsApp(...)
 4
 5@wa.on_message(filters.text)
 6def handle_message(client: WhatsApp, msg: types.Message):
 7    if msg.text == "stop":
 8        msg.stop_handling()
 9    else:
10        msg.continue_handling()
Validating Updates#
WhatsApp recommends
validating incoming webhook requests with the X-Hub-Signature-256 header.
Pywa validates updates by default when app_secret is provided:
1from pywa import WhatsApp
2
3wa = WhatsApp(
4    app_secret="xxxx",
5    validate_updates=True,
6    ...
7)
If no app_secret is provided, pywa disables validation and emits a warning. If validation is
enabled and the signature is missing or invalid, pywa rejects the request before calling your
handlers. You can disable validation explicitly with validate_updates=False.
Using Other Web Frameworks#
FastAPI and Flask are registered automatically. For any other web framework, create the HTTP routes yourself and call pywa’s webhook helper methods.
Your framework needs two routes on the same endpoint:
GETfor the verification challenge.POSTfor incoming webhook updates.
Verification route:
1challenge, status = wa.webhook_challenge_handler(
2    vt=request.GET[utils.HUB_VT],
3    ch=request.GET[utils.HUB_CH],
4)
5
6return challenge, status
Update route:
 1body = request.body
 2
 3validation_error = wa.webhook_update_validator(
 4    update=body,
 5    hmac_header=request.headers.get(utils.HUB_SIG),
 6)
 7
 8if validation_error:
 9    return validation_error
10
11response, status = wa.webhook_update_handler(update=body)
12return response, status
With manual framework integration, you are responsible for returning the right response format for your framework and for running the server.
Note
Regardless of how you run pywa (pywa dev, pywa run, or run()),
it creates a small Starlette app backed by Uvicorn and registers two routes on webhook_endpoint:
GET— answers WhatsApp’s verification challenge.POST— receives and dispatches incoming webhook updates.
When you pass a FastAPI or Flask server, pywa registers the same routes on that app instead.
For any other framework, use the manual helper methods above.
Tip
Common best practices:
Always add a filter (e.g.,
filters.text) to message handlers that readmsg.textso the handler is never called withNone.Avoid long blocking operations inside synchronous handlers — they block the entire event loop. Use threads or switch to
pywa_asyncfor async handlers.Use
prioritysparingly. Explicit filters are usually cleaner than execution ordering.Use
shared_dataon the update object to pass context between chained handlers instead of global state.
- Handler Decorators
WhatsApp.on_message()WhatsApp.on_callback_button()WhatsApp.on_callback_selection()WhatsApp.on_flow_completion()WhatsApp.on_flow_request()WhatsApp.on_message_status()WhatsApp.on_phone_number_change()WhatsApp.on_identity_change()WhatsApp.on_call_connect()WhatsApp.on_call_terminate()WhatsApp.on_call_status()WhatsApp.on_call_permission_update()WhatsApp.on_user_marketing_preferences()WhatsApp.on_template_status_update()WhatsApp.on_template_category_update()WhatsApp.on_template_quality_update()WhatsApp.on_template_components_update()WhatsApp.on_edited_message()WhatsApp.on_deleted_message()WhatsApp.on_outgoing_message()WhatsApp.on_outgoing_edited_message()WhatsApp.on_outgoing_deleted_message()WhatsApp.on_account_update()WhatsApp.on_raw_update()WhatsApp.remove_callbacks()WhatsApp.load_handlers_modules()
- Handler Objects
WhatsApp.add_handlers()WhatsApp.add_flow_request_handler()WhatsApp.remove_handlers()MessageHandlerCallbackButtonHandlerCallbackSelectionHandlerFlowCompletionHandlerFlowRequestHandlerMessageStatusHandlerPhoneNumberChangeHandlerIdentityChangeHandlerCallConnectHandlerCallTerminateHandlerCallStatusHandlerCallPermissionUpdateHandlerUserMarketingPreferencesHandlerTemplateStatusUpdateHandlerTemplateCategoryUpdateHandlerTemplateQualityUpdateHandlerTemplateComponentsUpdateHandlerEditedMessageHandlerDeletedMessageHandlerOutgoingMessageHandlerOutgoingEditedMessageHandlerOutgoingDeletedMessageHandlerAccountUpdateHandlerRawUpdateHandler