🎛️ Handlers#
To handle the updates from WhatsApp, you need a way to receive them. This is done by starting a web server that will receive the updates from WhatsApp and then call your callback function to handle them.
To allow maximum flexibility, pywa does not start the server. This allows the server to be
started independently with the desired configurations without any need for pywa to know them.
All pywa does is register a route that will handle the incoming updates from WhatsApp.
This means that you can use the same server to handle other parts of your application without any limitation from pywa.
In order for WhatsApp to send the updates to your server, you need a callback url.
The callback url must be a public, secure (HTTPS) url that points to your server (or your local machine if you are testing locally). You can use a service like Cloudflare Tunnel or localtunnel to create a secure tunnel to which WhatsApp can send the updates. These services will give you a public url that points to your machine (where you run the code).
Tip
Facebook keep blocking domains that are used by these services (e.g. ngrok, localtunnel, etc.). So, you may need to try multiple services to find one that works, or use a custom domain.
Here is an example using Cloudflare Tunnel:
You will get screen with the public url that points to your machine
cloudflared tunnel --url http://localhost:8080
Once you have a public url, You need to register it. This can be done two ways:
Automatically by pywa
Manually in the WhatsApp App Dashboard
Automatically registering the callback url#
This is the easiest way to register the callback url. All you need to do is to pass the url to the callback_url argument
when initializing the WhatsApp client and pywa will automatically register the url, and handle the verification request
for you.
This method requires the ID and the secret of the WhatsApp app. See Here how to get them.
Example using FastAPI
Install FastAPI (
pip3 install -U "pywa[fastapi]"):
 1import fastapi
 2import uvicorn
 3from pywa import WhatsApp
 4
 5fastapi_app = fastapi.FastAPI()
 6
 7wa = WhatsApp(
 8    phone_id='1234567890',
 9    token='xxxxxx',
10    server=fastapi_app,
11    callback_url='https://abc123.trycloudflare.com',
12    verify_token='XYZ123',
13    app_id=123456,
14    app_secret='xxxxxx'
15)
16
17... # register the handlers
18
19if __name__ == '__main__':
20    uvicorn.run(fastapi_app, port=8080)
The port that fastapi is running on (8080 in the example above) must be the same port that the callback url is listening on (e.g. cloudflared tunnel --url http://localhost:8080).
Registering the callback url manually in the WhatsApp App Dashboard#
In this method, pywa will not register the callback url for you. Instead, pywa will assume that you have already registered an callback url, or that you will register one AFTER you start the server.
If you already have callback url that points to your server, you just need to start the server (on the same port that the callback url is listening on).
If not, you will need to register a callback url manually in the WhatsApp App Dashboard, And this need to be done AFTER you start the server, so pywa can handle the verification request from WhatsApp.
So, start the server:
Example using FastAPI
Install FastAPI (
pip3 install -U "pywa[fastapi]"):
 1import fastapi
 2import uvicorn
 3from pywa import WhatsApp
 4
 5fastapi_app = fastapi.FastAPI()
 6
 7wa = WhatsApp(
 8    phone_id='1234567890',
 9    token='xxxxxx',
10    server=fastapi_app,
11    verify_token='XYZ123',
12)
13
14... # register the handlers
15
16if __name__ == '__main__':
17    uvicorn.run(fastapi_app, port=8080)
The port that fastapi is running on (8080 in the example above) must be the same port that the callback url is listening on (e.g. cloudflared tunnel --url http://localhost:8080).
Then, register the callback url in the WhatsApp App Dashboard.
The registration can be done in the App Dashboard > WhatsApp > Configuration > Callback URL. You need to enter the webhook url
and the verify token that you used when initializing the WhatsApp client.

Important
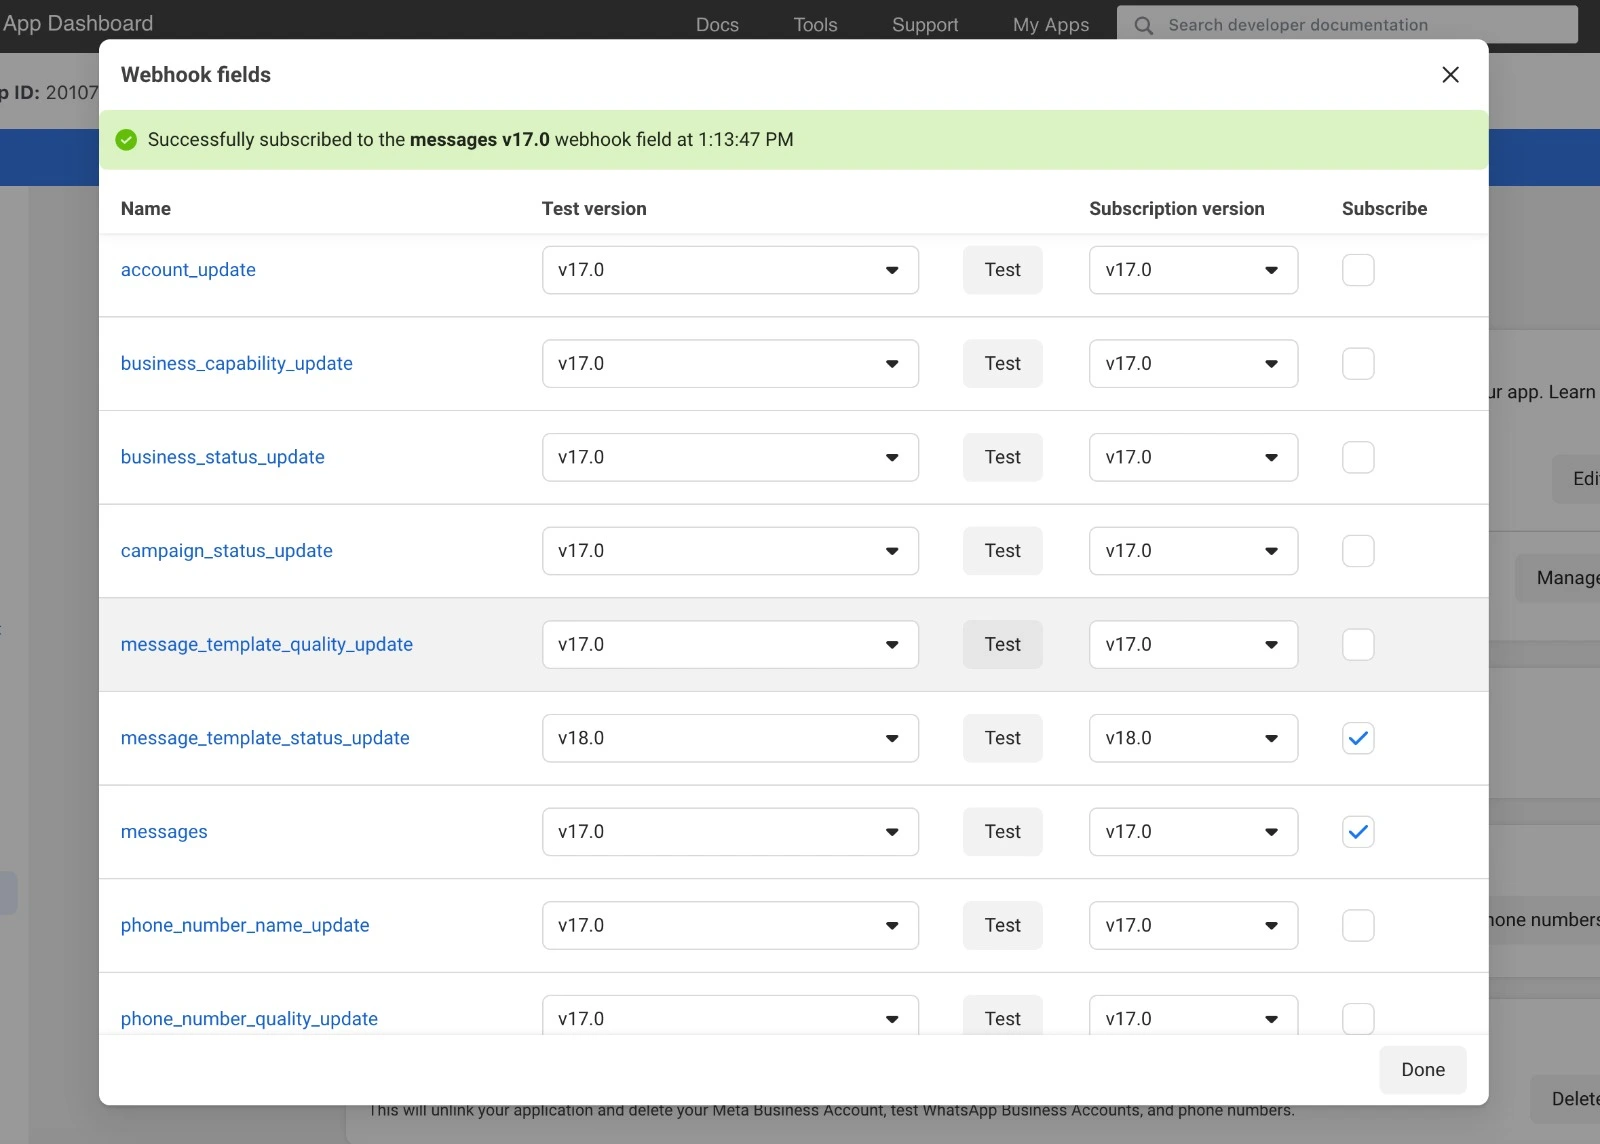
When registering the callback url manually, you must subscribe to webhook fields in your webhook settings. Otherwise, you will not receive any updates.
To enable it, go to your app dashboard, click on the Webhooks tab (Or the Configuration tab > Webhook fields).
Then, subscribe to the fields you want to receive.
- The current supported fields are:
messages(all user related updates)message_template_status_update(template got approved, rejected, etc.)
You can subscribe to all the other fields, but they will not be handled by pywa, they can still be handled manually by
registering a callback for the on_raw_update() decorator (or the RawUpdateHandler handler).
If everything is correct, WhatsApp will start sending the updates to the webhook url.
Registering a callback function#
To handle the incoming updates, you need to register a callback function. This function will be called whenever an update is received from WhatsApp.
Tip
A callback function can be both a synchronous or an asynchronous function.
from pywa import WhatsApp

wa = WhatsApp(...)

@wa.on_message()
async def handle_message(client: WhatsApp, message: Message):
    print(message)
- A callback function is a function that takes two (positional) arguments:
The WhatsApp client object (
WhatsApp)The update object (
Message,CallbackButton, etc.)
Here is an example of a callback functions
def print_message(client: WhatsApp, msg: Message):
    print(msg)

def react_to_button(client: WhatsApp, clb: CallbackButton):
    clb.react('❤️')
Once you define the callback function, you have two ways to register it:
Using decorators#
The easiest way to register a callback function is to use the on_message and the other on_... decorators:
 1from pywa import WhatsApp
 2from pywa.types import Message, CallbackButton
 3from fastapi import FastAPI
 4
 5fastapi_app = FastAPI()
 6wa = WhatsApp(..., server=fastapi_app)
 7
 8@wa.on_message()
 9def handle_message(client: WhatsApp, message: Message):
10    print(message)
11
12
13@wa.on_callback_button()
14def handle_callback_button(client: WhatsApp, clb: CallbackButton):
15    print(clb.data)
uvicorn main:fastapi_app
Using Handler objects#
The other way to register a callback function is to use the add_handlers() method and pass the function wrapped in
a Handler object. This is useful when your application is large and you want to separate the handlers from the
main code, or when you want to dynamically register handlers programmatically.
1from pywa import WhatsApp
2from pywa.types import Message, CallbackButton
3
4def handle_message(client: WhatsApp, message: Message):
5    print(message)
6
7def handle_callback_button(client: WhatsApp, clb: CallbackButton):
8    print(clb.data)
 1from pywa import WhatsApp
 2from pywa.handlers import MessageHandler, CallbackButtonHandler
 3from my_handlers import handle_message, handle_callback_button
 4from fastapi import FastAPI
 5
 6fastapi_app = FastAPI()
 7wa = WhatsApp(..., server=fastapi_app)
 8
 9wa.add_handlers(
10    MessageHandler(handle_message),
11    CallbackButtonHandler(handle_callback_button)
12)
uvicorn main:fastapi_app
See also
See how to filter updates in Filters.
Stop or continue handling updates#
When a handler is called, when it finishes, in default, the next handler will be called.
 1from pywa import WhatsApp
 2from pywa.types import Message
 3
 4wa = WhatsApp(...)
 5
 6@wa.on_message()
 7def handle_message(client: WhatsApp, message: Message):
 8    print(message)
 9    # The next handler will be called
10
11@wa.on_message()
12def handle_message2(client: WhatsApp, message: Message):
13    print(message)
14    # The next handler will be called
15
16...
You can change this behavior by setting the continue_handling to False when initializing WhatsApp.
1wa = WhatsApp(..., continue_handling=False)
2
3@wa.on_message()
4def handle_message(client: WhatsApp, message: Message):
5    print(message)
6    # The next handler will NOT be called
7...
You can also change this behavior inside the callback function by calling the stop_handling()
or continue_handling() methods on the update object.
 1from pywa import WhatsApp, filters
 2from pywa.types import Message
 3
 4wa = WhatsApp(...)
 5
 6@wa.on_message(filters.text)
 7def handle_message(client: WhatsApp, message: Message):
 8    print(message)
 9    if message.text == 'stop':
10        message.stop_handling() # The next handler will NOT be called
11    else:
12        message.continue_handling() # The next handler will be called
13
14...
Validating the updates#
WhatsApp recommends
validating the updates by checking the signature of the update. This is done by comparing the
signature of the update with the signature that WhatsApp sends in the X-Hub-Signature-256 header of the request.
To enable this feature, you need to pass the app_secret when initializing the WhatsApp client.
1from pywa import WhatsApp
2
3wa = WhatsApp(
4    validate_updates=True, # Default is True
5    app_secret='xxxx',
6    ...
7)
If the signature is invalid, pywa will return an HTTP 401 Unauthorized response.
The validation is done by default. You can disable this feature by setting the validate_updates to False when initializing WhatsApp.
Available handlers#
Decorator |
Handler |
The type of the update |
|---|---|---|